October 31, 2021
Halloween Greetings from the Lee & Pearl Mad Scientist Laboratory...
Make your own faux-soapstone painted table for dolls!
As part of our fabulous Mad Scientist set for Dolloween 2017, Pearl created this elegant and ultra-realistic faux soapstone lab table.
A soapstone lab table was always part of Pearl's vision for this set.
You see, both "Lee" and "Pearl" studied chemistry at historic Stuyvesant High School in New York City, where the old lab room featured rows of mottled black soapstone tables, festooned with ancient gas tubing serving the bunsen burner jets that got our beakers full of stinking fluids bubbling and boiling.
Good times.
Soapstone has been the traditional table or countertop material for chemistry labs for generations. It's dense and non-porous, naturally anti-bacterial, inert to acids and most chemicals, and resistant to heat. Primarily composed of highly compressed talc, soapstone is also relatively soft — so you won't smash your beakers just by setting them down they way you might on a granite or marble slab.
But Pearl also knew that a real soapstone table was going to be an impossible find at doll scale. So the table of her doll-lab dreams was going to have to be another crafty Lee & Pearl paint job...
Good thing we LOVE doll-scale painting.
Before plunging into this project, take a moment to consider the visual characteristics to keep in mind when trying to turn wood and paint into soapstone:
Soapstone is charcoal black or dark gray. It has a matte surface with a dense, heavy appearance. Slight mottling gives an impression of depth to the surface, while irregular veining runs throughout. And items made of soapstone typically have soft, slightly rounded edges.
Run a search for "vintage soapstone lab table" or "soapstone countertop" and you'll see what we mean. Then check out the table Pearl created with the faux-finish tutorial we're going to show you:
Not bad, huh?
We want to give credit to the Simplicity in the South blog, where our designer Pearl found the basic directions for this technique. There are lots of different faux-finishing and faux-marbling techniques out there, but this was a clear favorite because it uses ordinary acrylic paints and does not require special waxes or tools.
Are you ready? Let's create a soapstone table for dolls!
Step 1 — Find or build a table or counter
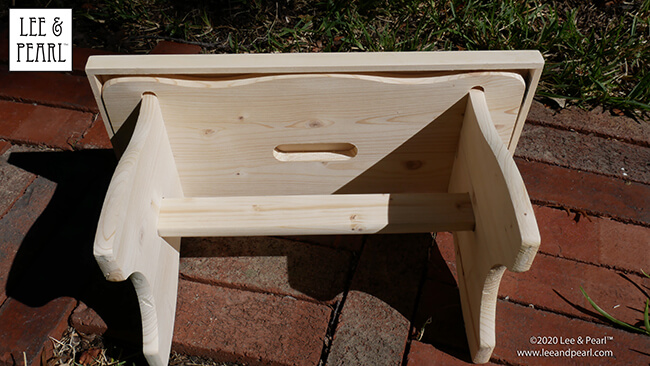
Pearl got lucky with this step. On her first shopping trip to the local Home Goods store, she found a kiddie stool on the clearance rack that was the perfect size and height for the base of a doll countertop (15" long x 7 1/2" wide x 7 3/4" high).
If you are looking for a similar base, we recommend such stools — and also squat candleholders, jewelry boxes and lots of other random items from home decor aisles and thrift shops.
Feel free to be creative with the table base. Maybe your table has legs, maybe it has drawers, maybe it's a solid block? Lab tables and counters come in lots of different forms. And remember, you can paint that base, too. Pearl painted her stool with a dark brown textured spray paint to give the impression of a rusty, iron base.
Though the size and height of the stool were perfect for a lab table, the wavy edges and slot cut out of the center of the stool were not, so Pearl built a removable flat tabletop using 1/4" thick basswood strips from Michaels craft store.
The fun thing about having a removable painted top for this project is that we can build different tops in the future, and paint them with different faux techniques! What would you like to see next... marble, granite, butcher block, linoleum?
Step 2 — Collect painting supplies
Gesso or spackle
Black liquid acrylic paint
White liquid acrylic paint
Matte clear spray enamel or matte sealer to finishSandpaper — medium fine to very fine (we used 220, 400 and 600 grits)
Tack cloth or microfiber rag
Small spray bottle
Disposable pipettes for measuring paint and water
Paint mixing cups or palettes
Brushes and foam applicators, including a fine brush for veining
Paper towels, rubber gloves, waterAnd the most unique tool — a thin plastic grocery bag
Step 3 — Create a smoothly primered base
(From here on in, we'll be showing the painting technique on wooden disks that we purchased at the craft store. This is exactly the same technique that we used for the original table, just with much better pictures.)
Before painting faux stone on wood, you have to create an absolutely smooth finish. Any visible wood grain will give the game away. For such a finish, mere spray primer won't be enough. Instead, use multiple coats of spackle or gesso.
Apply the coats as smoothly and evenly as possible. Let dry between coats and sand with progressively finer sand paper until you have a glassy smooth surface on the top and side edges of your tabletop.
With the sandpaper, go ahead and round the corners slightly as well to give them that soft, well-worn soapstone look.
After sanding, clean off the dust with a tack cloth or microfiber rag.
Resist the temptation to stop after just one coat. That's what we did at first, and that's why we're applying gesso on top of an already-painted disk in the photos above, because we found out that one coat is NOT enough.
That's one reason we love doing faux finishes on plastic, by the way. Plastic surfaces are already smooth, and you only need to apply a thin primer to allow the faux finish to properly adhere. Painting plastic is like going to the garden center and grabbing a bunch of pretty annuals that are already blooming and popping them in your garden beds. Everything is instantly lovely, but it doesn't last forever. Painting wood is that $5 plant in a $50 hole — it takes prep work, but the results can last a very long time.
Step 4 — Paint it black
Apply a coat of black acrylic paint. We used a sponge applicator to keep brush marks to a minimum.
Let the paint dry, then repeat the sanding process with very fine sandpaper. Apply a second coat of paint if you need it for full coverage (we did), then very lightly sand again and remove dust with a microfiber rag or tack cloth.
Step 5 — Create the mottling
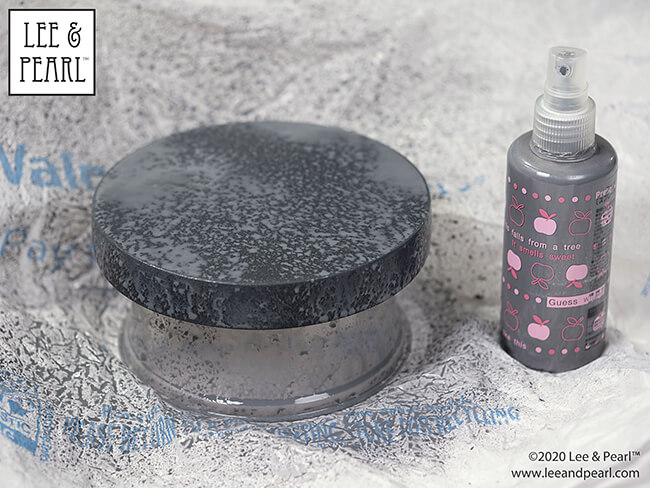
In a spray bottle, mix up a watery gray wash with 1/3 cup water, 1 teaspoon black paint and 1 teaspoon white paint.
On a well-protected surface, lightly spray the top and sides of your tabletop with the gray wash. Don't worry about getting perfectly even coverage as you're going to squish that paint around next.
While the sprayed wash is still wet, crumple up that THIN PLASTIC GROCERY BAG and use it to daub all around the top and sides of your surface, creating an evenly mottled pattern.
Since you are doing this for a doll-scale table, make sure that the bag is crumpled tightly and the mottled pattern is small scale.
Let the mottled surface dry completely.
Step 6 — Apply a black wash for depth
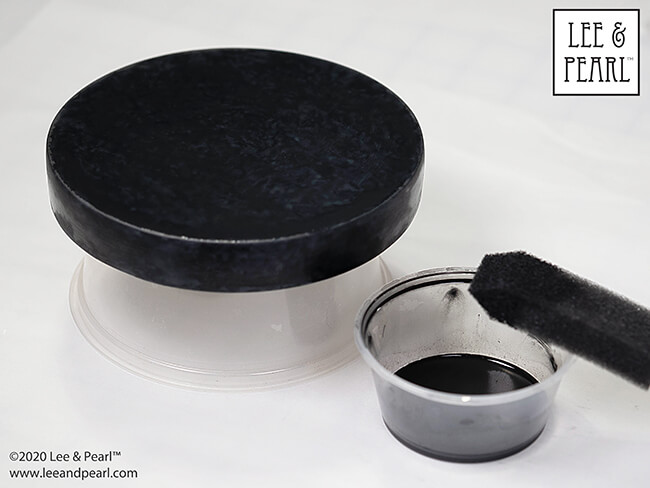
Though the mottling above looks great, it's a little too in-your-face for genuine soapstone. So we're going to apply a wash of black paint over it for a more subtle effect.
In a separate dish or paint palette, make the black wash with 3 parts water to 1 part black paint. Apply this black wash evenly over your surface, giving depth and subtlety to the mottling underneath.
Let the black wash dry completely. NOTE: This will dry lighter than it appears when wet. If the mottling underneath isn't subtle enough once the black wash has dried, do a second coat.
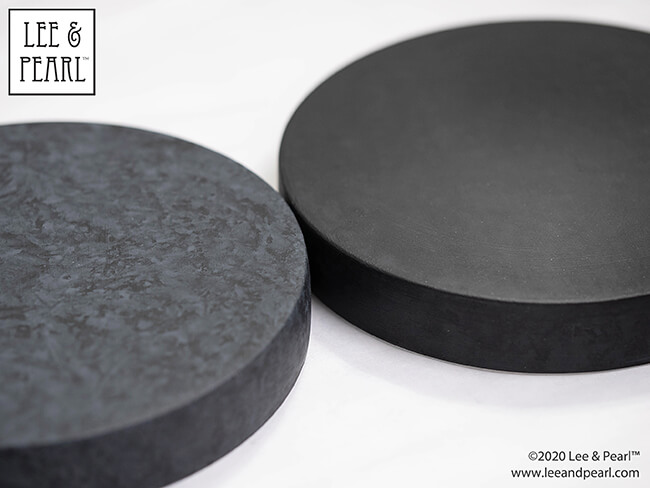
The picture above shows the mottled disk (on the left) next to the mottled-and-washed disk (on the right). You can see that the black wash makes the mottling VERY subtle.
But if you scroll back up to the black painted disk and compare it to this image, you'll see that even the faint mottling makes quite a difference. The suggestion of depth it gives to the surface helps trick the eye into seeing stone instead of painted wood.
Step 7 — Create the veining
For this step, you need to have a visual reference. Go take a look at soapstone images online to get an idea of the kind of veining you want.
Soapstone veining can be subtle or not-so-subtle and it's usually not very regular. Veins tend to cluster in some areas, while other areas have almost none. And remember, we are making doll-scale furniture — so shrink your veins and your vein spacing to match the size of your surface.
Pour a little of the gray wash from your spray bottle in a plastic dish or palette. Add a few drops of white acrylic paint and mix until you like the color and consistency.
Paint on the veins with a thin brush or the thin edge of a rectangular or wedge-shaped brush. If some of your veining reaches the edge, make sure it continues down the edge to mimic the depth of a vein of crystallized mineral deposits within the rock.
To soften your painted veins, lightly pounce over them with a very faintly damp paper towel before they dry.
When you are happy with the effect, let everything dry thoroughly.
Step 8 — Seal your faux soapstone surface
Finish your painted surface with a clear matte spray enamel or matte acrylic sealer and you are done!
Remember to use a MATTE sealer for a soapstone effect, and not a glossy marble or granite look.
We hope that you enjoyed this step-by-step tutorial. And here's an added bonus: Pearl recreated this tutorial as part of a LIVE video on our Facebook page last year. So you can follow a full video of this tutorial as well at the link below —
CLICK HERE to follow along as designer Pearl demonstrates each faux soapstone painting step in a video filmed LIVE on our Facebook page!
Need inspiration and equipment for your own doll chemistry lab or anatomy lab?
CLICK HERE to revisit the Mad Scientist Laboratory newsletter, with lots of doll prop and costume information, links and tutorials!
Want '80s fashion fun for your dolls? Sign up for the Lee & Pearl mailing list to get our FREE exclusive subscriber Pattern 1984: Retro '80s Romper for 18 Inch Dolls — as well as pattern announcements, tutorials and behind-the-scenes news from Lee & Pearl delivered directly to your inbox.
CLICK HERE to sign up for the Lee & Pearl mailing list
See you next time!


![]()